

Post-Ostomy Self-Care
- Lisa Febre
- Mar 30, 2023
- 7 min read
Updated: Jul 2, 2023
By Lisa Febre
You’re not alone, as a new ostomy patient I was overwhelmed. Here is how I learned how to take it slow, keep it simple, and learn about this new normal.
This article is reprinted at the UOAA Website: https://www.ostomy.org/ostomy-what-post-surgery-ostomy-advice/

I awoke from surgery like many new ostomates: confused, frightened, angry, overwhelmed, sad, and anxious. A cancer diagnosis and a colostomy were more than I could handle for one morning. It’s a lot to take in, and I just wasn’t ready to face any of it.
Until I had my ostomy, I did not know what this was. Sometimes I would hear vague references on a tv show to “a bag,” but no proper descriptions or explanations. I had a bag and no idea what it was or what to do with it. Afraid to look at it, I thought I might see something so gross it would prevent me from taking care of myself. Would I need to rely on someone else to take care of me from now on? Did all my independence just go out the window with one surgery?
Though knowledgeable and well meaning, the ostomy nurse at the hospital left me feeling overwhelmed. The information she was sharing came at breakneck speed. Words like “flange,” “wafer,” “stoma,” “output,” and “pouching system” were being thrown around as if I already knew what they were. Demonstrations of things like ostomy powders and barrier tape only confused me more. All I remembered from the half-hour spent with the ostomy nurse was how to measure my stoma and how to cut the barrier to size.
The ostomy nurse had a lot of information to cover in a short period, and she thought all of it was important. Afraid of failing, I was certain that I was going to make terrible mistakes. I doubted my ability to do any of this. Amidst my stress over the new colostomy, I was also recovering from major abdominal surgery. A colectomy is a dramatic change to the body. In my case, I had a large vertical incision that needed care, along with the sutures around my new stoma. Five days after surgery, I was still easing into my post-op life with a soft-solids diet, gradually introducing new foods according to the nutrition guidelines my surgeon and nutritionist had set for me. Exhausted, sore, depressed, and worried about the future, I had a lot on my plate.
Learn About Your Ostomy Supplies
Videos to the rescue. The ostomy supply manufacturers offer “how-to” videos on YouTube and elsewhere for their products, which are straightforward and helpful. I spoke with a customer support representative from the medical supply service a few days after I got home, and he gave me the best advice: “keep it simple until you get the hang of it. Then you can try the fancy stuff.” His explanations were simpler and this time, he instilled me with confidence. He took the time to answer my questions and used language that made it clear to me that this wasn’t rocket science.
Don’t be afraid to make phone calls to the ostomy supply companies. Their customer service people can be the most helpful people you’ll encounter with your ostomy. Also get the New Ostomy Patient Guide from UOAA that has images and articles to help you adjust to all the new terminology and information.
Get to know the parts of your pouching system. Hospitals will send you home with a particular brand, so begin there but know you can sample a variety of products. I had a 2-piece, filtered, drainable system with a flat barrier (wafer). I decided to stick with what the surgeon had stuck on me, copying that for a few weeks. Thankfully, it can take up to a week after surgery for the gut to work again, so I had time to get to know the appliance before having to deal with output.
Take it Slow
Caring for the colectomy and ostomy incisions was no different from other surgeries. Follow the hospital’s discharge instructions, which are to keep the sutures dry when bathing (there are excellent waterproof dressings readily available online and at your pharmacy). It’s a good idea to trim your barrier adhesive patch to avoid your midline incision until it is fully healed. Even though the sutures around your stoma are being exposed to output, don’t panic. Gently wash the area with each appliance change. Your surgeon will give you important instructions regarding lifting limits. This usually entails not lifting over 5 pounds for several weeks. They will also advise you to walk as much as possible. Movement aids in jumpstarting your digestion, so walk every day! Always follow your doctor’s instructions: many people are at high risk for parastomal hernia. Your surgeon will tailor your lifting and activity limits to your personal needs, and it is in your best interest to follow those instructions diligently.
Keep it Simple
Keep things as simple as possible as you adjust to your new ostomy. Don’t burden yourself by wondering about all the extra items floating around in the “Starter Kit.” When people in your support group talk about tricks and tips, don’t worry, you’ll soon reach a point when you’re the one giving the advice. It’s overwhelming in the beginning, but before you know it, you’ll become familiar with all the accessories, too. As your body recovers, and you settle into your new normal, you’ll gain confidence in caring for your ostomy. For a month after surgery, I only dealt with the wafer/barrier and pouch. Simplicity helped me feel confident.
After surgery, your stoma will be inflamed. For 8-12 weeks after surgery, as it heals, it will change size before settling into its permanent size. Each time you change your barrier, use the stoma template that comes with your supplies. And don’t worry if your stoma bleeds a little – this is completely normal and should stop quickly. If the bleeding is heavy, it won’t stop, or you know for a fact you cut your stoma on a sharp edge, call your doctor or ostomy nurse. Don’t be afraid: stomas move before and during output. Your stoma is a living piece of your intestine and intestines move! It is normal for it to retract and pucker. It will let you know when something is about to happen. This is very useful when you’re not home; you’ll feel more confident about knowing when to find a bathroom.
Find the Supplies that Work Best for You
By the end of the first 6 weeks, I was feeling much surer of myself with taking care of my colostomy. Then, I tried all kinds of pouching systems along with many accessories. When I changed brands, I went through the process all over again, speaking to sales representatives and using all the free samples they sent me. Just remember you’ll need a prescription for your supplies from your surgeon, so once the hospital sets you up with a supply company, give that to them. And if/when you change brands, you’ll need a new prescription for that. Don’t worry, it sounds confusing now, but your supply company should handle these details for you.
Be Kind to Yourself and Embrace Peer Support
It’s normal to be overwhelmed in the beginning, so aim to keep things simple. If your ostomy nurse was like mine and raced through the material, it’s difficult to feel confident on your own. Hit reset and try to copy what the surgeon put on you after surgery. Your home health aide may or may not have experience with ostomies, so do your own research and practice with sample supplies. Join a support group as soon after surgery as you can. Armed with information, experience, and support, you, too, will find the confidence you need to care for your new ostomy.
Lisa Febre is the author of “Round the Twist: Facing the Abdominable,” a memoir about her diagnosis and treatment of Stage-4c Colon Cancer, which hits bookshelves in September 2023. She had a descending colostomy for 10-months. To learn more visit her at UOAA’s National Conference in August or visit lisafebre.com.
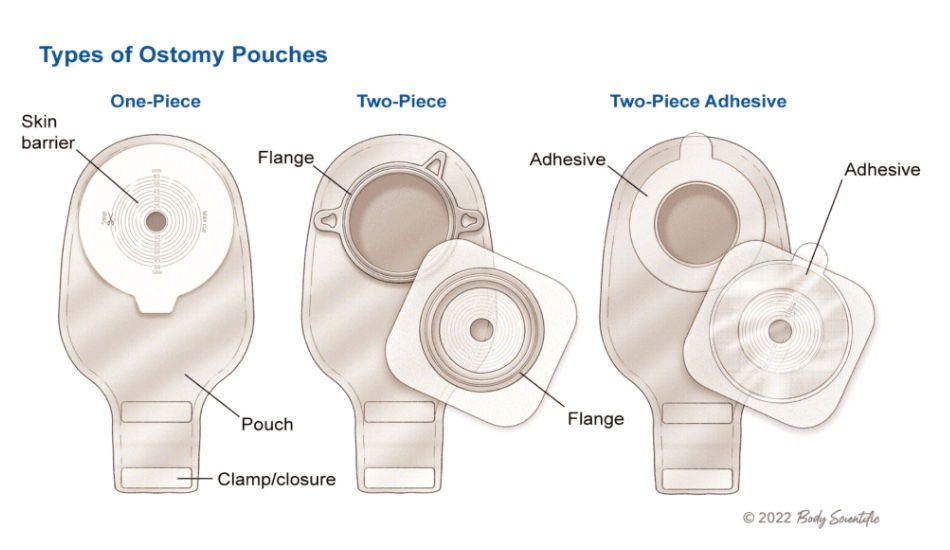
It helps to learn the names of the basic parts of your prosthetic and familiarize yourself with what they do:
Barrier/Wafer: the baseplate held on your skin with powerful adhesives attaches to the pouch.
Pouch: simply put, this is 'the bag' everyone talks about. It can be open at the end (drainable) or not (closed); there may be a filter (or not) that lets out excess air; and it may be clear or opaque. I preferred drainable clear bags with filters – this not only prevented my bag from blowing up like a balloon, but let me empty it whenever I wanted, and because it was clear, I could see how much was in it.

1-Piece system: the barrier and the bag are already connected. To change the bag, you need to remove the barrier from your skin. I chose not to use this system because I have sensitive skin and more frequent barrier changes would have likely irritated my skin more.
2-Piece system (shown at left): the barrier and the bag are separate. The bag can be removed any time you want while leaving the barrier on your skin. I liked this because I could change the bag without changing the barrier, which gave me more confidence when I was out in public. I could also remove the bag when I showered or wanted to clean around my stoma.
Adhesive Remover: wipes or spray, this is absolutely necessary to get the barrier off without irritating your skin. Although some barriers look like regular first-aid bandages, they are not the same! Trying to rip the barrier off your delicate tummy will be painful and leave you with damaged, broken, inflamed skin that the next barrier will not stick to.

Skin Prep Wipes: Before placing the next barrier on your skin, use these wipes to create a much more receptive surface for the adhesives. It also protects your skin from irritation.
Bandage Scissors: Specialized scissors with a rounded “nose” to cut the barrier without leaving behind sharp edges. These are great. If the hospital did not send you home with a pair, get them yourself for just a few dollars at a pharmacy or online.


